Table of contents
- Getting started with Vaadin-on-Kotlin
- Guide Assumptions
- Completed App
- What is Vaadin-on-Kotlin?
- Creating a New VoK Project
- Hello, Vaadin-on-Kotlin!
- Setting up Intellij Community
- Getting Up and Running
- Laying down the groundwork
- The first form
- Creating articles
- Creating the Article model
- Running a Migration
- Saving data in the CreateArticleView
- Showing Articles
- Listing All Articles
- Adding links
- Adding Some Validation
- Updating Articles
- Creating components to clean up duplication in views
- Deleting Articles
- Adding a Second Database Entity
- Refactoring
- Deleting Comments
- Security
- What’s Next?
- Feedback
Getting started with Vaadin-on-Kotlin
Vaadin-on-Kotlin, or VoK for short, is an opinionated web application framework which uses Vaadin for its front-end and Kotlin for its back-end. Vaadin lets you forget the web and program user interfaces and lets you program much like when creating a desktop application with conventional Java toolkits such as AWT, Swing, or SWT. Kotlin allows you to write clean, understandable and maintainable code.
This guide teaches you how to get Vaadin On Kotlin (VoK) up and running. It introduces the basic concepts needed to create your own applications.
Tribute: I got heavily inspired by the excellent Ruby on Rails tutorial.
After reading this guide, you will be able to:
- Create a VoK application, and connect it to a SQL database.
- Understand the general layout of a VoK application.
- Write the starting pieces of a VoK application.
Note: To skip the introduction and dive straight into the code, just skip to Creating a new Vok project
Guide Assumptions
I assume you have no prior knowledge of VoK and your goal is to create a VoK application from scratch. Though you don’t need to be a seasoned programmer to follow through, I assume a basic working knowledge of Kotlin and Vaadin.
If you have no prior experience with Kotlin or Vaadin, you might get overwhelmed by the sheer amount of new information. Therefore, I recommend to take it slowly and get familiar with both Vaadin and Kotlin first:
- To learn about Kotlin, consider the following materials:
- If you have no prior experience with Vaadin, take a look at the official documentation:
- Official Vaadin website
- Vaadin Documentation - we recommend to download and read the Vaadin Book PDF.
I encourage you to experiment with the Karibu-DSL Hello World Example at any point since VoK uses Karibu-DSL under the hood, therefore the lessons learned in the Karibu-DSL Hello World example will come in handy later on in all VoK-based apps.
Completed App
If you get stuck, or you’d simply love to skip forward and see the complete sources in action quickly, you can find the complete sources at vok-helloworld-app, the “complete” git branch.
What is Vaadin-on-Kotlin?
VoK is a glue between Vaadin, Kotlin and other frameworks which allows you to write web apps smoothly. It is designed to make the art of programming of web applications easier by making assumptions about what every developer needs to get started. It allows you to write less code while accomplishing more than many other languages and frameworks.
VoK is opinionated software. It makes the assumption that there is a “best” way to do things, and it’s designed to encourage that way - and in some cases to discourage alternatives.
The VoK philosophy includes three major guiding principles:
- Simplicity - things are kept as simple as possible, and libraries are used only when absolutely necessary. Complex patterns such as Dependency Injection and MVC are deliberately left out.
- Components as basic building blocks - Vaadin is a single-page web component framework as opposed to the traditional multiple page frameworks. As such, it resembles the traditional fat client Swing/JavaFX programming and is closer to GUI software development than the traditional web development with HTML and JavaScript. VoK promotes code/UI reuse by means of reusing components (your components will range from basic ones to a complex containers, even forms) instead of creating page templates. It is a predecessor to the Web Components technology.
- No magic - No proxies, interceptors, reflection. VoK introduces explicit functions which you can easily browse for sources in your Intellij IDEA.
Notes For Java Programmers
Traditionally both JavaEE and Spring acted as this “glue” which held various frameworks together. But, with the advent of the Kotlin programming language, we believe that the features of the Kotlin programming language alone are all that’s necessary in the modern programming. We believe that the era of traditional approach of using the Dependency Injection, Annotations and auto-discovery magic is over and the Kotlin programming language itself is all that’s needed to glue stuff together.
While the Dependency Injection (DI) itself is not hard to understand, it comes with unfortunate consequences:
- The DI forces the programmer to create Services/DAOs even for tiny CRUD operations. While having Services is a desirable practice in larger project, it is overkill for simple projects. And you can have Services without DI.
- The DI requires you to run on a DI container, such as a JavaEE server, or with tons of Spring libraries. While that’s nothing new for a seasoned Java developer, this is overwhelming for a newbie which is just starting with the web app development. Also, with the advent of Docker, we believe the time of Java servers such as JavaEE and Spring is over.
- DI doesn’t scale: It quickly tends to get very complex as the DI configuration grows. DI is not something that you’ll need in the future anyway as your project grows: on the contrary, it adds additional layer of complexity.
- DI doesn’t work well with Vaadin: injecting services into Vaadin components forces you to turn Vaadin components themselves into beans, which is not compatible with the Vaadin framework. It’s far better to create a repository of services (one class which gives access to all services).
- We consider DI an anti-pattern. We replace it with Kotlin built-in language features.
Therefore, VoK itself is not using DI; you can of course use Spring or JavaEE in your project alongside VoK if necessary.
Note on MVC: The Model-View-Controller pattern is very popular with page-oriented frameworks such as Ruby on Rails, Groovy on Grails and Python Django. There is typically lot of things going on in the page, and the MVC pattern helps keeping the code separated into smaller, more easily digestable packages.
However, since Components are a much smaller unit of reuse than pages, employing MVC with Component-oriented frameworks does not make that much sense: for example it will usually leave you with nearly empty Views. We thus believe that using MVC does more harm than good since it adds unnecessary complexity. Therefore this tutorial will not use MVC.
Creating a New VoK Project
The best way to read this guide is to follow it step by step. All steps are essential to run this example application and no additional code or steps are needed.
By following along with this guide, you’ll create a VoK project called blog, a (very) simple weblog. Before you can start building the application, you need to make sure that you have Java 17 JDK or newer installed.
Prerequisites
Vaadin-on-Kotlin only requires Java 17 JDK to be installed. The example application has Gradle bundled in; Gradle will then download everything else (Vaadin, Kotlin, libraries, the Jetty server which is used to run the app from the command line). This makes VoK applications really portable since they work flawlessly on any OS and CPU which supports Java 17 - be it Windows, Linux or Mac, on x86, ARM or others.
The example application also uses an embedded Java database called H2, so there is no need for you to set up any database.
While it is possible to edit the project files using any text editor, we recommend to install Intellij IDEA which provides awesome Kotlin support including auto-completion. Please use the free IDEA Community edition which allows you to run the app easily, or you can purchase the Ultimate edition which also offers awesome database integration tools.
Creating the Blog Application
Getting the example application is really easy. If you have Git installed, just open a command line and run the following command:
$ git clone https://github.com/mvysny/vok-helloworld-app
If you don’t have Git, you can simply download the application as a zip file from GitHub: https://github.com/mvysny/vok-helloworld-app/archive/master.zip.
After you create the blog application, switch to its folder:
$ cd vok-helloworld-app
$ ./gradlew
This will download everything necessary and will compile the example application’s zip file.
Note: WAR (Web ARchive) is Java standard for packaging web applications. However, with the advent of Docker, we believe that the traditional way of deploying WAR into Java Servlet Servers (e.g. Tomcat or JBoss) is now obsolete. It is far easier to run your app via the
main()function. Please visit Vaadin Boot to learn more.
The vok-helloworld-app directory has a number of files and folders that make up the structure of a VoK application. Most of the work in this tutorial will happen in the src/main/kotlin folder, but here’s a basic rundown on the function of each of the files and folders:
| File/Folder | Purpose |
|---|---|
src/main/kotlin | Contains the source files of all of your views, Servlets, REST endpoints, async jobs for your application. You’ll focus on this folder for the remainder of this guide. |
src/main/resources/webapp | Contains the ‘Chuck Norris’ image file |
src/main/resources | Contains the logger configuration file (logback.xml) |
build.gradle.kts | This file defines tasks that can be run from the command line. You should add your own tasks by adding code to this file. There is much you can do with Gradle - you can for example use the ssh plugin to deploy the WAR to your production environment. |
README.md | This is a brief instruction manual for your application. You should edit this file to tell others what your application does, how to set it up, and so on. |
| .gitignore | This file tells git which files (or patterns) it should ignore. See Github - Ignoring files for more info about ignoring files. |
Hello, Vaadin-on-Kotlin!
To begin with, let’s get some text up on screen quickly. To do this, let’s get the app running.
Starting up the Web Server
You actually have a functional VoK application already. To see it, you need to start the app on your development machine. You can do this by running the following in the vok-helloworld-app directory:
$ ./gradlew clean run
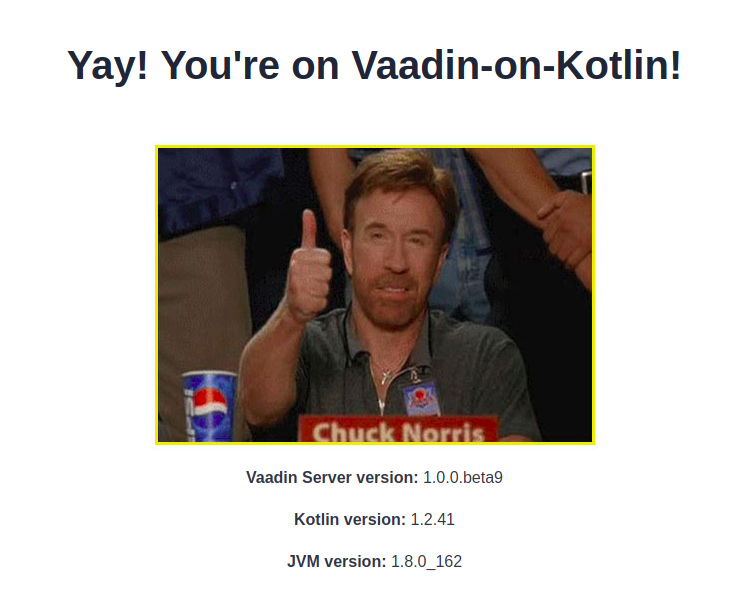
This will fire up Jetty, an embedded Java web server. To see your application in action, open a browser window and navigate to http://localhost:8080. You should see the Vaadin-on-Kotlin default information page:
Note: To stop the web server, hit Ctrl+C in the terminal window where it’s running. To verify the server has stopped you should see your command prompt cursor again. For most UNIX-like systems including macOS this will be a dollar sign $.
Note: Changes made to your Kotlin files will not be propagated to the running server in this mode. However, we’ll learn how to run the app from Intellij, for a proper full-blown developer environment.
The “Welcome aboard” page is the smoke test for a new VoK application: it makes sure that you have your software configured correctly enough to serve a page.
Say “Hello”, Vaadin
To get VoK saying “Hello”, you need to create a route.
The purpose of a route is to provide a Vaadin Component (usually a layout containing other components), which then interacts with the user. The Route Registry decides which view receives which requests. Usually there is exactly one route to a view. You can collect the data to be displayed right in the view itself (for small applications), or you can define so-called Service layer (a group of regular Kotlin classes which define a clear API and are responsible for fetching of the data). VoK however does not enforce this, and we will not use this pattern in the tutorial.
All Vaadin Components have two parts:
- Their JavaScript-based client side Web Component which you usually can not control directly from your program;
- A server side class which you access from your code.
For example, a Button Web Component (vaadin-button) contains the logic to send the notification about the mouse click to all JavaScript listeners; server-side Button registers the JavaScript listener, transfers the event server-side and allows you to register server-side listeners which listen for button clicks.
Another example: vaadin-grid shows a list of data in tabular fashion; it performs scrolling and fetching of the data as the user scrolls, via a data provider. Server-side Grid allows you to set the DataProvider which will actually fetch the data, from the database or from anywhere, depending on how you implement it.
To create a new view, all that’s needed is to create a Kotlin class which is annotated with the @Route annotation and extends some Vaadin Component.
Create the src/main/kotlin/com/example/vok/MyWelcomeView.kt file and make sure it looks like follows:
package com.example.vok

import com.github.mvysny.karibudsl.v10.*
import com.vaadin.flow.router.Route

@Route("")
class MyWelcomeView: KComposite() {
    private val root = ui {
        verticalLayout {
            h1("Hello, Vaadin-on-Kotlin!")
        }
    }
}
Setting the Application Home Page
Now that we have made the view, we need to tell VoK when we want “Hello, Vaadin-on-Kotlin!” to show up. In our case, we want it to show up when we navigate to the root URL of our site, http://localhost:8080. At the moment, “Welcome aboard” is occupying that spot.
Open up the WelcomeView.kt file and change the @Route("") annotation to the following: @Route("old-welcome"). This will map the original “Welcome aboard” page to http://localhost:8080/old-welcome , making space for our new Hello page.
Having the @Route("") on MyWelcomeView will tell the Vaadin Route Registry to map requests to the root of the application to the MyWelcomeView view.
Launch the app again and navigate to http://localhost:8080 in your browser. You’ll see the “Hello, Vaadin-on-Kotlin!” message you put into the web/src/main/kotlin/com/example/vok/MyWelcomeView.kt, indicating that this new route is indeed going to MyWelcomeView and is rendering the view correctly.
Setting up Intellij Community
To have a proper file editor, with auto-completion features and all, let’s set up Intellij IDEA Community. Download and install Intellij IDEA Community if you haven’t done that already. Then run Intellij. In the welcome screen, select the “Open” button and open the vok-helloworld-app directory as a project. Please give Intellij a bit of time to open the project and download all files.
In your Intellij, open the src/main/kotlin/com/example/vok/Main.kt file. It contains just one function called main() which runs the entire app. There’s a little green arrow to the left of the function; simply right-click the arrow and select “Debug ‘Main’” from the menu. Your app is now running from your Intellij!
The app may fail to start since it’s already running from a command-line from previous experiments. In such case, simply press CTRL+C in the terminal to kill the old app, then try to launch the app from Intellij again.
Running the app from Intellij in debug mode allows you to publish changes in your file directly to the running app easily. Simply edit the file, then press CTRL+F9 (or Build / Build Project from the menu) then reload the page in your browser.
To stop or restart the app from Intellij, simply hit the red square Stop button in the upper-right part of the screen.
Getting Up and Running
Now that you’ve seen how to create a view, let’s create something with a bit more substance.
In the Blog application, you will now create a new database table, or in REST terms, a resource. A resource is the term used for a collection of similar objects, such as articles, people or animals. You can create, read, update and destroy items for a resource and these operations are referred to as CRUD operations.
VoK provides a resources method which can be used to declare a standard REST resource. But first, let us define the article. Create the src/main/kotlin/com/example/vok/Article.kt file with the following contents:
package com.example.vok

import com.github.vokorm.*
import com.gitlab.mvysny.jdbiorm.Dao

data class Article(
        override var id: Long? = null,

        var title: String? = null,

        var text: String? = null
) : KEntity<Long> {
    companion object : Dao<Article, Long>(Article::class.java)
}
This will define a so-called entity class, which basically represents a row in the “Article” database table.
We can now implement the REST endpoint for REST clients to access the article resource.
Note: This step is completely optional and is actually not used by Vaadin, since Vaadin Flow uses its own internal JSON protocol to communicate with components. Having REST may come handy though, since we can use it to examine the state of the database (using the
curlorwgettools).
Just create a file web/src/main/kotlin/com/example/vok/ArticleRest.kt which will look as follows:
package com.example.vok

import com.github.mvysny.karibudsl.v10.getAll
import io.javalin.Javalin
import io.javalin.http.NotFoundResponse

fun Javalin.articleRest() {
    get("/rest/articles/:id") { ctx ->
        val id = ctx.pathParam("id").toLong()
        ctx.json(Article.findById(id) ?: throw NotFoundResponse("No article with id $id"))
    }
    get("/rest/articles") { ctx -> ctx.json(Article.findAll()) }
}
In order to take these REST endpoints into use, in the Bootstrap.kt, edit the configureRest() function at the end of the file and make sure it calls our articleRest() function:
fun Javalin.configureRest(): Javalin {
    articleRest()
    return this
}
This will add the possibility to retrieve the articles via a REST call. Just try
$ wget localhost:8080/rest/articles
You will get 500 internal server error; the server log will show a long stacktrace, with the most interesting part being
Caused by: org.h2.jdbc.JdbcSQLException: Table "ARTICLE" not found; SQL statement:
select * from Article [42102-196]
	at org.h2.message.DbException.getJdbcSQLException(DbException.java:345)
	at org.h2.message.DbException.get(DbException.java:179)
	at org.h2.message.DbException.get(DbException.java:155)
That is to be expected since we haven’t yet created the table for Articles. We’ll do that in a minute. In the next section, you will add the ability to create new articles in your application and be able to view them. This is the “C” and the “R” from CRUD: create and read. The form for doing this will look like this:
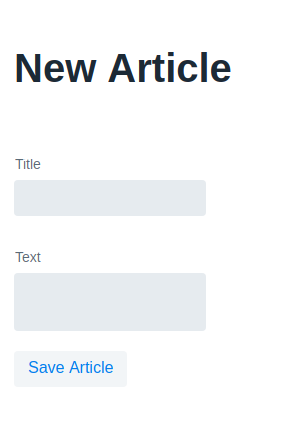
It will look a little basic for now, but that’s ok. We’ll look at improving the styling for it afterwards.
Before going any further, please create a Kotlin file named src/main/kotlin/com/example/vok/MainLayout.kt with the following contents:
package com.example.vok

import com.github.mvysny.karibudsl.v10.KComposite
import com.github.mvysny.karibudsl.v10.div
import com.vaadin.flow.component.page.Viewport
import com.vaadin.flow.router.RouterLayout

@Viewport(Viewport.DEVICE_DIMENSIONS)
class MainLayout : KComposite(), RouterLayout {
  private val root = ui {
    div {
      setSizeFull()
    }
  }
}
This is the main application layout or application frame, into which all views will be nested. This will allow you to add an application menu or more controls shared for all views.
Laying down the groundwork
Firstly, you need a place within the application to create a new article. A great place for that would be at create-article. Navigate to http://localhost:8080/create-article and you’ll see a general error:
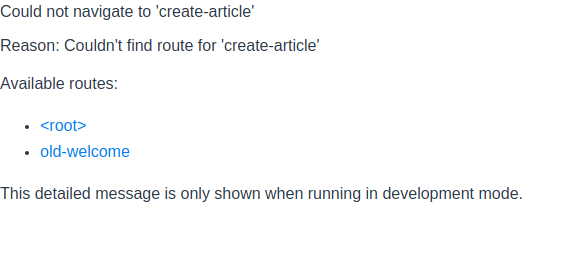
This happens because there is no View yet, mapped to the create-article route.
The first form
The solution to this particular problem is simple: create a Kotlin file named web/src/main/kotlin/com/example/vok/CreateArticleView.kt as follows:
package com.example.vok

import com.github.mvysny.karibudsl.v10.*
import com.vaadin.flow.router.Route

@Route("create-article", layout = MainLayout::class)
class CreateArticleView : KComposite() {
    private val binder = beanValidationBinder<Article>()
    private val root = ui {
        verticalLayout {
            h1("New Article")
            textField("Title") {
                bind(binder).bind(Article::title)
            }
            textArea("Text") {
                bind(binder).bind(Article::text)
            }
            button("Save Article")
        }
    }
}
If you restart the server and refresh the page now, you’ll see the exact same form from our example above. Building forms in VoK is really just that easy!
There is a problem with the form though - when you click the “Save Article” button, nothing will happen. Currently, the click listener is empty, we will need to add the database code to save the article.
Creating articles
To make the “Save Article” button do something, just change the class as follows:
package com.example.vok

import com.github.mvysny.karibudsl.v10.*
import com.vaadin.flow.router.Route

@Route("create-article", layout = MainLayout::class)
class CreateArticleView: KComposite() {
    private val binder = beanValidationBinder<Article>()
    private val root = ui {
        verticalLayout {
            h1("New Article")
            textField("Title") {
                bind(binder).bind(Article::title)
            }
            textArea("Text") {
                bind(binder).bind(Article::text)
            }
            button("Save Article") {
                onClick {
                    val article = Article()
                    if (binder.writeBeanIfValid(article)) {
                        article.save()
                    }
                }
            }
        }
    }
}
Now when you click the “Save Article” button, you’ll see an “Internal Error” notification - it’s because we haven’t created the database table for Article yet.
Creating the Article model
Luckily, we have already created the model - it’s the Article entity class. We will use VoK-ORM which will map the Article object to a relational (SQL) database. By default, it will map to the “Article” table. To create the table, we will have to create the migration.
Note: vok-orm is smart enough to automatically map column names to the Article class properties, which means you don’t have to provide the database name for every property inside entities, as that will be done automatically by vok-orm.
To create the migration, create a file named V01__CreateArticle.sql in the src/main/resources/db/migration directory, with the following contents:
create table Article(
  id bigint auto_increment PRIMARY KEY,
  title varchar(200) NOT NULL,
  text varchar(4000) NOT NULL
);
This is a SQL data definition (DDL) script which will create a table named Article with three columns. We are using the H2 database SQL dialect here.
Running a Migration
As we’ve just seen, migrations are simple SQL scripts which create and modify database tables. The database migration is done automatically, on the web app startup, by the Bootstrap class. You can also reconfigure your app to do the migrations manually instead, simply by commenting out relevant part of the Bootstrap class and altering the build.gradle file as stated in the Flyway Gradle documentation.
If you look in the V01__CreateArticle.sql file, you’ll see the V01 prefix, followed by two underscores, and then the name. The name may be arbitrary, and it doesn’t affect the migration outcome. The number defines the ordering - migration scripts will be run sorted by the version number, and exactly once. You can read more about the exact numbering rules in the Flyway Versioned Migrations Guide.
When Flyway runs this migration it will create an articles table with one string column and a text column.
At this point, you can simply kill and restart the app, to automatically run all migrations. Since we are currently using an in-memory H2 database, its contents are gone when the server is killed, and since we are starting with a fresh database, all migrations will run. When we’ll use a persistent database, Flyway will make sure that only a newly defined migrations are run.
Saving data in the CreateArticleView
Back in CreateArticleView view, everything is ready. Try clicking the “Save Article” button - seemingly nothing will happen, but the article will be saved into the database. To actually see the article, we will redirect to an ArticleView which we’ll define later.
Note: You might be wondering why the A in Article is capitalized above, whereas most other references to articles in this guide have used lowercase. In this context, we are referring to the class named Article that is defined in
web/src/main/kotlin/com/example/vok/Article.kt. It’s a convention for class names in Kotlin to begin with a capital letter.
Note: As we’ll see later,
binder.writeBeanIfValid()returns a boolean indicating whether the article was saved or not.
Showing Articles
If you submit the form again now, VoK will just stay on the form. That’s not very useful though, so let’s add the show action before proceeding.
Vaadin supports adding parameters after the view name. This way, we can pass the Article ID to the ArticleView as follows: http://localhost:8080/article/12. As we did before, we need to add the web/src/main/kotlin/com/example/vok/ArticleView.kt file:
package com.example.vok

import com.github.mvysny.karibudsl.v10.*
import com.github.vokorm.getById
import com.vaadin.flow.component.*
import com.vaadin.flow.router.*

@Route("article", layout = MainLayout::class)
class ArticleView: KComposite(), HasUrlParameter<Long> {
    private lateinit var title: Text
    private lateinit var text: Text
    private val root = ui {
        verticalLayout {
            div {
                strong("Title: ")
                this@ArticleView.title = text("")
            }
            div {
                strong("Text: ")
                this@ArticleView.text = text("")
            }
        }
    }

    override fun setParameter(event: BeforeEvent, articleId: Long?) {
        val article = Article.getById(articleId!!)
        title.text = article.title
        text.text = article.text
    }

    companion object {
        fun navigateTo(articleId: Long) = navigateToView(ArticleView::class, articleId)
    }
}
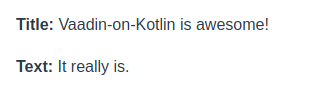
A couple of things to note. We use Article.getById(id) to find the article we’re interested in, passing in articleId to get the first parameter from the request. In Vaadin, the parameter is passed to the navigateToView() function which takes the view class and a parameter as its input, constructs the target URL and redirects the browser to the URL. In this case, http://localhost:8080/article/12.
The router then detects that the URL has been changed, it parses the view name out of the URL and invokes the view.setParameter() method. The parameter is passed as the second argument of the setParameter() function.
To navigate to the Article View, just add ArticleView.navigateTo(article.id!!) to your CreateArticleView.kt file, right below the article.save() call as follows:
...
        button("Save Article") {
            onClick {
                val article = Article()
                if (binder.writeBeanIfValid(article)) {
                    article.save()
                    ArticleView.navigateTo(article.id!!)
                }
            }
        }
...
With this change, you should finally be able to create new articles. Visit http://localhost:8080/create-article and give it a try!
Listing All Articles
We still need a way to list all our articles, so let’s do that. We’ll create the src/main/kotlin/com/examples/vok/ArticlesView.kt with the following contents:
package com.example.vok

import com.github.mvysny.karibudsl.v10.*
import com.vaadin.flow.component.grid.Grid
import com.vaadin.flow.router.*
import eu.vaadinonkotlin.vaadin10.vokdb.dataProvider

@Route("articles", layout = MainLayout::class)
class ArticlesView: KComposite(), AfterNavigationObserver {
    private lateinit var grid: Grid<Article>
    private val root = ui {
        verticalLayout {
            setSizeFull()
            h1("Listing Articles")
            grid = grid(Article.dataProvider) {
                isExpand = true; setSizeFull()

                columnFor(Article::id)
                columnFor(Article::title)
                columnFor(Article::text)
            }
        }
    }

    override fun afterNavigation(event: AfterNavigationEvent) {
        grid.refresh()
    }
}
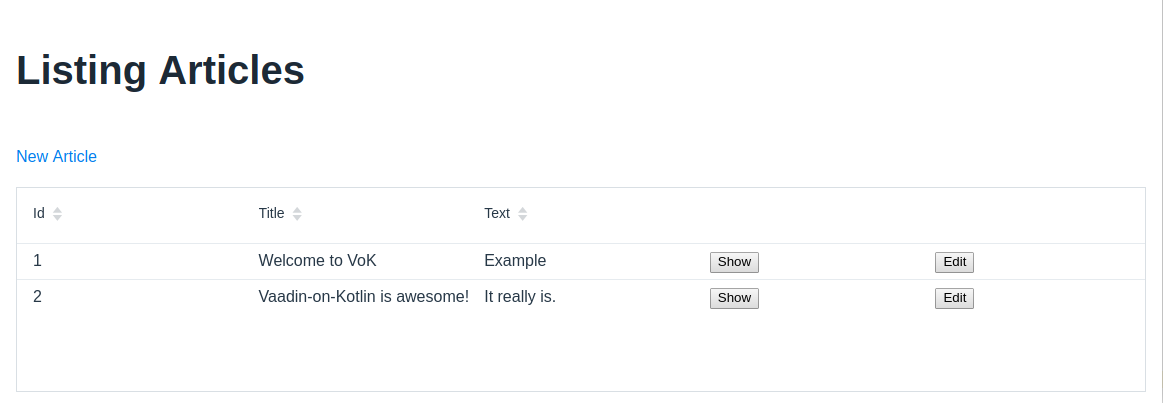
Now if you go to http://localhost:8080/articles you will see a list of all the articles that you have created. Note that we have used the Grid component. Grid is a powerful tabular component which supports paging and lazy-loading of the data, including sorting and filtering.
Adding links
You can now create, show, and list articles. Now let’s add some links to navigate through pages.
Open src/main/kotlin/com/example/vok/MyWelcomeView.kt and modify its contents as follows:
package com.example.vok

import com.github.mvysny.karibudsl.v10.*
import com.vaadin.flow.router.Route

@Route("", layout = MainLayout::class)
class MyWelcomeView: KComposite() {
    private val root = ui {
        verticalLayout {
            h1("Hello, Vaadin-on-Kotlin!")
            routerLink(text = "My Blog", viewType = ArticlesView::class)
        }
    }
}
The Vaadin RouterLink component creates a hyperlink based on text to display and where to go - in this case, to the path for articles.
Let’s add links to the other views as well, starting with adding this “New Article” link to ArticlesView class, placing it above the grid declaration:
routerLink(null, "New Article", CreateArticleView::class)
This link will allow you to bring up the form that lets you create a new article.
Now, add another link in CreateArticleView, underneath the form’s “Save Article” button, as the last line of the init{} block, to go back to the index action:
routerLink(null, "Back", ArticlesView::class)
Finally, add a link to the ArticleView view to go back to the index action as well (into the init{} block under those labels), so that people who are viewing a single article can go back and view the whole list again:
routerLink(null, "Back", ArticlesView::class)
Note: remember, when you are running the server via
./gradlew web:appRun, you will either need to kill the server and re-run again, or you’ll need to run./gradlew buildin another terminal, to actually see the outcome of your changes.
Adding Some Validation
The entity file, Article.kt is about as simple as it can get.
There isn’t much to this file - but both vok-orm and Vaadin-on-Kotlin supplies a great deal of functionality to your entities for free, including basic database CRUD (Create, Read, Update, Destroy) operations, data validation, as well as sophisticated search support and the ability to relate multiple models to one another.
Vaadin-on-Kotlin includes methods to help you validate the data that you send to models. Open the Article.kt file and edit it:
package com.example.vok

import com.github.vokorm.*
import com.gitlab.mvysny.jdbiorm.Dao
import org.hibernate.validator.constraints.Length
import jakarta.validation.constraints.NotNull

data class Article(
        override var id: Long? = null,

        @field:NotNull
        @field:Length(min = 5)
        var title: String? = null,

        @field:NotNull
        @field:Length(min = 2)
        var text: String? = null
) : KEntity<Long> {
    companion object : Dao<Article, Long>(Article::class.java)
}
These changes will ensure that all articles have a title that is at least five characters long. VoK can validate a variety of conditions in an entity, including the presence or uniqueness of columns, their format, and the existence of associated objects. The Hibernate Validator is used to provide validation support; validations are covered in detail in the Hibernate Validator documentation.
With the validation now in place, when you call binder.writeBeanIfValid(article) on an invalid article, it will return false. If you open CreateArticleView.kt again, you’ll notice that we actually check the result of calling binder.writeBeanIfValid(article) inside the create action. However, if writeBeanIfValid() fails, we need to show the form back to the user, and mark all invalid fields. To do this, change the button definition as follows:
        button("Save Article") {
            onClick {
                val article = Article()
                if (binder.validate().isOk && binder.writeBeanIfValid(article)) {
                    article.save()
                    ArticleView.navigateTo(article.id!!)
                }
            }
        }
If you reload http://localhost:8080/create-article and try to save an article without a title, VoK will send you back to the form, with the invalid fields marked red. The binder.validate().isOk call will mark invalid fields, while binder.writeBeanIfValid(article) will write the values to the article entity, but only if everything is valid.
Updating Articles
We’ve covered the “CR” part of CRUD. Now let’s focus on the “U” part, updating articles.
The first step we’ll take is adding the src/main/kotlin/com/example/vok/EditArticleView.kt:
package com.example.vok

import com.github.mvysny.karibudsl.v10.*
import com.github.vokorm.getById
import com.vaadin.flow.router.*

@Route("edit-article", layout = MainLayout::class)
class EditArticleView: KComposite(), HasUrlParameter<Long> {
    private val binder = beanValidationBinder<Article>()
    private var article: Article? = null
    private val root = ui {
        verticalLayout {
            h1("Edit Article")
            textField("Title") {
                bind(binder).bind(Article::title)
            }
            textArea("Text") {
                bind(binder).bind(Article::text)
            }
            button("Save Article") {
                onClick { event ->
                    val article = article!!
                    if (binder.validate().isOk && binder.writeBeanIfValid(article)) {
                        article.save()
                        ArticleView.navigateTo(article.id!!)
                    }
                }
            }
            routerLink(null, "Back", ArticlesView::class)
        }
    }

    override fun setParameter(event: BeforeEvent, articleId: Long?) {
        edit(Article.getById(articleId!!))
    }

    private fun edit(article: Article) {
        this.article = article
        binder.readBean(article)
    }

    companion object {
        fun navigateTo(articleId: Long) = navigateToView(EditArticleView::class, articleId)
    }
}
The view will contain a form similar to the one we used when creating new articles. The only difference is that when the view is entered (that is, navigated to), it looks up the article ID, loads the article and binds it with the components.
Finally, we want to show a link to the edit action in the list of all the articles, so let’s add that now to ArticlesView.kt to make it appear next to the “Show” link. Just change the grid {} block as follows:
        grid = grid(Article.dataProvider) {
            isExpand = true; setSizeFull()

            columnFor(Article::title)
            columnFor(Article::text)
            addColumn(NativeButtonRenderer<Article>("Show", { ArticleView.navigateTo(it.id!!) }))
            addColumn(NativeButtonRenderer<Article>("Edit", { EditArticleView.navigateTo(it.id!!) }))
        }
Note: The
NativeButtonRendererwill be marked red; you will need to import the class. You can do that simply by pressingAlt+Enterand choosing Import from the menu.
And we’ll also add one to the ArticleView.kt template as well, so that there’s also an “Edit” link on an article’s page. Modify the class to look as follows:
package com.example.vok

import com.github.mvysny.karibudsl.v10.*
import com.vaadin.flow.component.*
import com.vaadin.flow.router.*

@Route("article", layout = MainLayout::class)
class ArticleView: KComposite(), HasUrlParameter<Long> {
    private lateinit var editLink: RouterLink
    private lateinit var title: Text
    private lateinit var text: Text
    private val root = ui {
        verticalLayout {
            div {
                strong("Title: ")
                this@ArticleView.title = text("")
            }
            div {
                strong("Text: ")
                this@ArticleView.text = text("")
            }
            editLink = routerLink(null, "Edit")
            routerLink(text = "Back", viewType = ArticlesView::class)
        }
    }

    override fun setParameter(event: BeforeEvent, articleId: Long?) {
        val article = Article.getById(articleId!!)
        title.text = article.title
        text.text = article.text
        editLink.setRoute(EditArticleView::class, articleId)
    }

    companion object {
        fun navigateTo(articleId: Long) = navigateToView(ArticleView::class, articleId)
    }
}
And here’s how our app looks so far:
Creating components to clean up duplication in views
Our EditArticleView view looks very similar to the CreateArticleView view; in fact, they both share the same code for displaying the form. Let’s remove this duplication by using a common component.
Create a new file src/main/kotlin/com/example/vok/ArticleEditor.kt with the following content:
package com.example.vok

import com.github.mvysny.karibudsl.v10.*
import com.vaadin.flow.component.HasComponents

class ArticleEditor : KComposite() {
    private val binder = beanValidationBinder<Article>()
    var article: Article? = null
        set(value) {
            field = value
            if (value != null) binder.readBean(value)
        }

    private val root = ui {
        verticalLayout {
            isMargin = false
            textField("Title") {
                bind(binder).bind(Article::title)
            }
            textArea("Text") {
                bind(binder).bind(Article::text)
            }
            button("Save Article") {
                onClick { event ->
                    val article = article!!
                    if (binder.validate().isOk && binder.writeBeanIfValid(article)) {
                        article.save()
                        ArticleView.navigateTo(article.id!!)
                    }
                }
            }
            routerLink(null, "Back", ArticlesView::class)
        }
    }
}

fun HasComponents.articleEditor(block: ArticleEditor.()->Unit = {}) = init(ArticleEditor(), block)
This is just an ordinary Vaadin component which you can insert anywhere into your View. Its API consists of a single public property named article. When you assign this property, the ArticleEditor will populate the fields and the user will be able to edit the article. When you press the “Save Article” button, the ArticleEditor component will either create a new article, or update an existing one.
The function HasComponents.articleEditor() looks interesting. The function has been specially crafted in a way that allows us to build Vaadin UIs in a structured way, using purely Kotlin code. This technique is called DSL (Domain Specific Language). The name fits - in a way we have constructed a ‘language’ used to create Vaadin UIs. You can find more information about the Kotlin DSL at the Kotlin Type-Safe Builders.
Using type-safe builders or DSL has the advantage that the Kotlin compiler will check for typos, and the Kotlin IDEA plugin will help us with the auto-completion.
Note: The Karibu-DSL library actually defines such builder functions for every Vaadin component. You can check the Basic.kt file for the definitions of the sources for the
buttonandtextFieldbuilder methods.
Now, let’s update the CreateArticleView.kt view to use this new component, rewriting it completely:
package com.example.vok

import com.github.mvysny.karibudsl.v10.*
import com.vaadin.flow.router.Route

@Route("create-article", layout = MainLayout::class)
class CreateArticleView: KComposite() {
    private lateinit var editor: ArticleEditor
    private val root = ui {
        verticalLayout {
            h1("New Article")
            editor = articleEditor {
                article = Article()
            }
        }
    }
}
Then do the same for the EditArticleView.kt view:
package com.example.vok

import com.github.mvysny.karibudsl.v10.*
import com.vaadin.flow.router.*

@Route("edit-article", layout = MainLayout::class)
class EditArticleView: KComposite(), HasUrlParameter<Long> {
    private lateinit var editor: ArticleEditor
    private val root = ui {
        verticalLayout {
            h1("Edit Article")
            editor = articleEditor()
        }
    }

    override fun setParameter(event: BeforeEvent, articleId: Long?) {
        editor.article = Article.getById(articleId!!)
    }

    companion object {
        fun navigateTo(articleId: Long) = navigateToView(EditArticleView::class, articleId)
    }
}
Deleting Articles
We’re now ready to cover the “D” part of CRUD, deleting articles from the database. To delete the article, all that’s needed is to call delete() in the article from appropriate place.
We will add a ‘Destroy’ link to the ArticlesView.kt file, to wrap everything together:
package com.example.vok

import com.github.mvysny.karibudsl.v10.*
import com.vaadin.flow.component.grid.Grid
import com.vaadin.flow.data.renderer.NativeButtonRenderer
import com.vaadin.flow.router.*
import eu.vaadinonkotlin.vaadin10.vokdb.dataProvider

@Route("articles", layout = MainLayout::class)
class ArticlesView: KComposite(), AfterNavigationObserver {
    private lateinit var grid: Grid<Article>
    private val root = ui {
        verticalLayout {
            setSizeFull()
            h1("Listing Articles")
            routerLink(text = "New Article", viewType = CreateArticleView::class)
            grid = grid(Article.dataProvider) {
                isExpand = true; setSizeFull()

                columnFor(Article::id)
                columnFor(Article::title)
                columnFor(Article::text)
                addColumn(NativeButtonRenderer<Article>("Show", { ArticleView.navigateTo(it.id!!) }))
                addColumn(NativeButtonRenderer<Article>("Edit", { EditArticleView.navigateTo(it.id!!) }))
                addColumn(NativeButtonRenderer<Article>("Destroy", { article ->
                    confirmDialog {
                        article.delete()
                        this@grid.refresh()
                    }
                }))
            }
        }
    }

    override fun afterNavigation(event: AfterNavigationEvent) {
        grid.refresh()
    }
}
The “Destroy” button calls the confirmDialog which shows a simple Vaadin dialog. The function is implemented in a way that it will call the follow-up block when the “Yes” button is clicked. The block will just delete the article and refresh the Grid, to display the new data. To get rid of the confirmation dialog, just delete the confirmDialog line:
            addColumn(NativeButtonRenderer<Article>("Destroy", { article ->
                article.delete()
                this@grid.refresh()
            }))
Note: To see the definition of the function, just open up Intellij IDEA and click your mouse on the
confirmDialogfunction name while holding theControlkey.

Congratulations, you can now create, show, list, update and destroy articles.
Adding a Second Database Entity
It’s time to add a second database table to the application. The second database table will handle comments on articles.
Creating the ‘Comments’ Entity
We’ll create a Comment entity to hold comments for an article. Create the following file: src/main/kotlin/com/example/vok/Comment.kt with the following contents:
package com.example.vok

import com.github.vokorm.*
import com.gitlab.mvysny.jdbiorm.Dao
import org.hibernate.validator.constraints.Length
import jakarta.validation.constraints.NotNull

data class Comment(
        override var id: Long? = null,

        var article_id: Long? = null,

        @field:NotNull
        @field:Length(min = 3)
        var commenter: String? = null,

        @field:NotNull
        @field:Length(min = 3)
        var body: String? = null
) : KEntity<Long> {
    companion object : Dao<Comment, Long>(Comment::class.java)

    val article: Article? get() = if (article_id == null) null else Article.findById(article_id!!)
}
This is very similar to the Article entity that you saw earlier. The difference is the property article which sets up an association. You’ll learn a little about associations in the next section of this guide.
Note the article_id column - it tells which Article the comment belongs to. You can get a better understanding after analyzing the appropriate migration script. Just create src/main/resources/db/migration/V02__CreateComment.sql file with the following contents:
create TABLE Comment(
  id bigint auto_increment PRIMARY KEY,
  commenter varchar(200) NOT NULL,
  body VARCHAR(4000) NOT NULL,
  article_id bigint not null REFERENCES Article(id)
);
The article_id line creates an integer column called article_id, an index for it, and a foreign key constraint that points to the id column of the articles table. Go ahead and run the project.
Since we are running an embedded database which starts in a clear state, all migrations will run:
15:43:44.532 [RMI TCP Connection(2)-127.0.0.1] INFO  com.example.vok.Bootstrap - Running DB migrations
15:43:44.553 [RMI TCP Connection(2)-127.0.0.1] INFO  o.f.c.internal.util.VersionPrinter - Flyway 4.2.0 by Boxfuse
15:43:44.676 [RMI TCP Connection(2)-127.0.0.1] INFO  o.f.c.i.dbsupport.DbSupportFactory - Database: jdbc:h2:mem:test (H2 1.4)
15:43:44.754 [RMI TCP Connection(2)-127.0.0.1] INFO  o.f.core.internal.command.DbValidate - Successfully validated 2 migrations (execution time 00:00.026s)
15:43:44.767 [RMI TCP Connection(2)-127.0.0.1] INFO  o.f.c.i.m.MetaDataTableImpl - Creating Metadata table: "PUBLIC"."schema_version"
15:43:44.792 [RMI TCP Connection(2)-127.0.0.1] INFO  o.f.core.internal.command.DbMigrate - Current version of schema "PUBLIC": << Empty Schema >>
15:43:44.794 [RMI TCP Connection(2)-127.0.0.1] INFO  o.f.core.internal.command.DbMigrate - Migrating schema "PUBLIC" to version 01 - CreateArticle
15:43:44.813 [RMI TCP Connection(2)-127.0.0.1] INFO  o.f.core.internal.command.DbMigrate - Migrating schema "PUBLIC" to version 02 - CreateComment
15:43:44.823 [RMI TCP Connection(2)-127.0.0.1] INFO  o.f.core.internal.command.DbMigrate - Successfully applied 2 migrations to schema "PUBLIC" (execution time 00:00.057s).
However, if we were to use a persistent database, FlyWay would be smart enough to only execute the migrations that have not already been run against the current database.
Associating Models
Vaadin on Kotlin associations let you easily declare the relationship between two entities. In the case of comments and articles, you could write out the relationships this way:
- Each comment belongs to one article.
- One article can have many comments.
You’ve already seen the line of code inside the Comment entity (Comment.kt) that makes each comment belong to an Article:
val article: Article? get() = if (article_id == null) null else Article.findById(article_id!!)
You’ll need to edit Article.kt to add the other side of the association:
package com.example.vok

import com.github.vokorm.*
import eu.vaadinonkotlin.vaadin10.*
import com.gitlab.mvysny.jdbiorm.Dao
import eu.vaadinonkotlin.vaadin10.vokdb.*
import org.hibernate.validator.constraints.Length
import jakarta.validation.constraints.NotNull

data class Article(
        override var id: Long? = null,

        @field:NotNull
        @field:Length(min = 5)
        var title: String? = null,

        var text: String? = null
) : KEntity<Long> {
    companion object : Dao<Article, Long>(Article::class.java)

    val comments: VokDataProvider<Comment> get() = Comment.dataProvider.withFilter { Comment::article_id eq id }
}
These two declarations enable a good bit of automatic behavior. For example, if you have a variable article containing an article, you can retrieve all the comments belonging to that article as an array using article.comments.getAll().
Note: Note that the
commentsfield is outside of thedata classconstructor. This is intentional, since thecommentsfield is not really a field but a computed property and thus can not stand as a constructor parameter.commentsis hence lazy - it is evaluated every time it is read; reading it causes a databaseselectto be run. That’s why thecommentsproperty shouldn’t appear inArticle.toString(), so that logging a newly created article (which callstoString()) won’t run a select. Computed properties also do not appear in the JSON output as returned by the REST services - this way we can prevent polluting of the REST JSON article output with all comments.
Exposing Comments via REST
You can expose the comments via the REST interface. This is completely optional and is not used by Vaadin in any way, it may just be handy to check your database status via the curl tool. Edit ArticleRest.kt:
package com.example.vok

import com.github.mvysny.karibudsl.v10.getAll
import io.javalin.Javalin
import io.javalin.http.NotFoundResponse

fun Javalin.articleRest() {
    get("/rest/articles/:id") { ctx ->
        val id = ctx.pathParam("id").toLong()
        ctx.json(Article.findById(id) ?: throw NotFoundResponse("No article with id $id"))
    }
    get("/rest/articles") { ctx -> ctx.json(Article.findAll()) }
    get("/rest/articles/:id/comments") { ctx ->
        val id = ctx.pathParam("id").toLong()
        val article = Article.findById(id) ?: throw NotFoundResponse("No article with id $id")
        ctx.json(article.comments.getAll())
    }
}
Now, you can run curl in your terminal:
$ curl localhost:8080/rest/articles/1/comments
[{"id":1,"commenter":"A buddy programmer","body":"I like Vaadin-on-Kotlin, too!"}]
Writing a view
Like with any blog, our readers will create their comments directly after reading the article, and once they have added their comment, will be sent back to the article show page to see their comment now listed.
So first, we’ll wire up the ArticleView.kt view to let us make a new comment:
package com.example.vok
import com.github.mvysny.karibudsl.v10.*
import com.vaadin.flow.component.*
import com.vaadin.flow.component.button.Button
import com.vaadin.flow.component.html.Div
import com.vaadin.flow.router.*
@Route("article", layout = MainLayout::class)
class ArticleView: KComposite(), HasUrlParameter<Long> {
private lateinit var article: Article
private lateinit var editLink: RouterLink
private lateinit var title: Text
private lateinit var text: Text
private lateinit var comments: Div
private val commentBinder = beanValidationBinder<Comment>()
private lateinit var createComment: Button
private val root = ui {
verticalLayout {
div {
strong("Title: ")
this@ArticleView.title = text("")
}
div {
strong("Text: ")
this@ArticleView.text = text("")
}
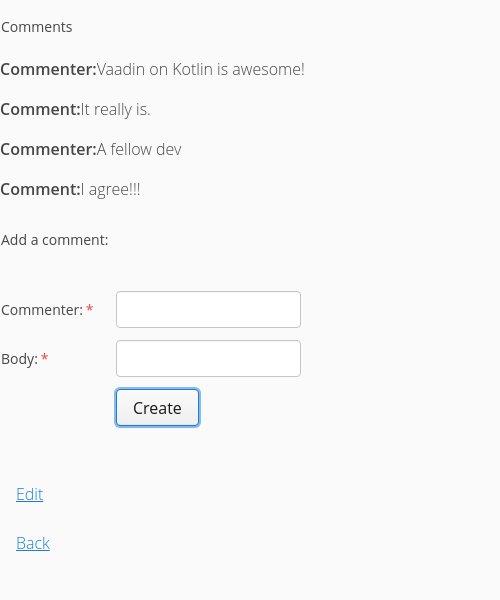
p("Comments")
comments = div()
p("Add a comment:")
textField("Commenter:") {
bind(commentBinder).bind(Comment::commenter)
}
textField("Body:") {
bind(commentBinder).bind(Comment::body)
}
createComment = button("Create") {
onClick { createComment() }
}
editLink = routerLink(null, "Edit")
routerLink(text = "Back", viewType = ArticlesView::class)
}
}
override fun setParameter(event: BeforeEvent, articleId: Long?) {
article = Article.getById(articleId!!)
title.text = article.title
text.text = article.text
editLink.setRoute(EditArticleView::class, articleId)
}
private fun createComment() {
val comment = Comment()
if (commentBinder.validate().isOk && commentBinder.writeBeanIfValid(comment)) {
comment.article_id = article.id
comment.save()
refreshComments()
commentBinder.readBean(Comment()) // this clears the comment fields
}
}
private fun refreshComments() {
comments.removeAll()
article.comments.getAll().forEach { comment ->
comments.html("<p><strong>Commenter:</strong>${comment.commenter}</p><p><strong>Comment:</strong>${comment.body}</p>")
}
}
companion object {
fun navigateTo(articleId: Long) = navigateToView(ArticleView::class, articleId)
}
}
This adds a form on the Article show page that creates a new comment, by calling the comment.save() code.
Once we have made the new comment, we need to stay on the page of the original article. That’s why there is no navigate call in the createComment() function. However, since the page does not reload (remember we use the single-page-framework), we need to refresh the comments ourselves. See the comments div? We will populate this div with a html-formatted list of all comments. This exactly is done by the refreshComments() function.
Now you can add articles and comments to your blog and have them show up in the right places.
Note: in the
refreshComments()thegetAll()function will re-fetch the fresh list ofcomments; the comments are not cached in theArticle.commentsfield. If you need to access the comment list multiple times, it is best to store the list of comments into a variable.
Refactoring
Now that we have articles and comments working, take a look at the src/main/kotlin/com/example/vok/ArticleView.kt view. It is getting long and awkward. We can create reusable components to clean it up.
The Comments Component
First, we will extract a component which will show comments for given article. Since we will need to add a ‘delete’ link in the future, the div component will no longer suffice. Create the src/main/kotlin/com/example/vok/CommentsComponent.kt file:
package com.example.vok

import com.github.mvysny.karibudsl.v10.*
import com.vaadin.flow.component.HasComponents
import com.vaadin.flow.component.orderedlayout.VerticalLayout

class CommentsComponent : KComposite() {
    var articleId: Long = 0L
        set(value) { field = value; refresh() }

    private lateinit var comments: VerticalLayout
    private val root = ui {
        verticalLayout {
            isMargin = false
            p("Comments")
            comments = verticalLayout()
        }
    }

    fun refresh() {
        comments.removeAll()
        Article.getById(articleId).comments.getAll().forEach { comment ->
            comments.apply {
                div {
                    html("<p><strong>Commenter:</strong>${comment.commenter}</p><p><strong>Comment:</strong>${comment.body}</p>")
                }
            }
        }
    }
}
// the extension function which will allow us to use CommentsComponent inside a DSL
fun HasComponents.commentsComponent(block: CommentsComponent.()->Unit = {}) = init(CommentsComponent(), block)
The component has a handy property articleId which, upon setting, will populate itself with comments for that particular article.
We also need the means to include the CommentsComponent component into the DSL, and thus we have also introduced the DSL extension method as well. The extension function simply calls the init() function, which performs the following things:
- Inserts the newly created component (in this case, the
CommentsComponent) into the parent layout; - Calls
blockto optionally allow us to configure the component further.
You can learn more about how DSL works, from the Writing Vaadin Apps In Kotlin Part 4 tutorial.
Converting the Comments Form to a component
Let us also move that new comment section out to its own component. Create the file named src/main/kotlin/com/example/vok/NewCommentForm.kt with the following contents:
package com.example.vok

import com.github.mvysny.karibudsl.v10.*
import com.vaadin.flow.component.HasComponents
import com.vaadin.flow.component.button.Button

class NewCommentForm : KComposite() {
    var commentCreatedListener: ()->Unit = {}
    lateinit var article: Article
    private val commentBinder = beanValidationBinder<Comment>()
    private lateinit var createComment: Button
    private val root = ui {
        verticalLayout {
            text("Add a comment:")
            textField("Commenter:") {
                bind(commentBinder).bind(Comment::commenter)
            }
            textField("Body:") {
                bind(commentBinder).bind(Comment::body)
            }
            createComment = button("Create") {
                onClick { createComment() }
            }
        }
    }

    private fun createComment() {
        val comment = Comment()
        if (commentBinder.validate().isOk && commentBinder.writeBeanIfValid(comment)) {
            comment.article_id = article.id
            comment.save()
            commentBinder.readBean(Comment())  // this clears the comment fields
            commentCreatedListener()
        }
    }
}
fun HasComponents.newCommentForm(block: NewCommentForm.()->Unit = {}) = init(NewCommentForm(), block)
The component handles the comment creation now. In order for the component to work properly, the article for which the comment is to be created must be set. Also, when the component creates the comment, it needs to notify the ArticleView about this fact. This is done by the means of the commentCreatedListener listener which the component calls upon comment creation. Now, let’s refactor the ArticleView.kt to make use of the NewCommentForm component, and register itself to NewCommentForm as a listener:
package com.example.vok

import com.github.mvysny.karibudsl.v10.*
import com.vaadin.flow.component.*
import com.vaadin.flow.router.*

@Route("article", layout = MainLayout::class)
class ArticleView: KComposite(), HasUrlParameter<Long> {
    private lateinit var editLink: RouterLink
    private lateinit var title: Text
    private lateinit var text: Text
    private lateinit var comments: CommentsComponent
    private lateinit var newComment: NewCommentForm
    private val root = ui {
        verticalLayout {
            div {
                strong("Title: ")
                this@ArticleView.title = text("")
            }
            div {
                strong("Text: ")
                this@ArticleView.text = text("")
            }
            comments = commentsComponent()
            newComment = newCommentForm {
                commentCreatedListener = { comments.refresh() }
            }
            editLink = routerLink(null, "Edit")
            routerLink(text = "Back", viewType = ArticlesView::class)
        }
    }

    override fun setParameter(event: BeforeEvent, articleId: Long?) {
        val article = Article.getById(articleId!!)
        newComment.article = article
        comments.articleId = articleId
        title.text = article.title
        text.text = article.text
        editLink.setRoute(EditArticleView::class, articleId)
    }

    companion object {
        fun navigateTo(articleId: Long) = navigateToView(ArticleView::class, articleId)
    }
}
Deleting Comments
Another important feature of a blog is being able to delete spam comments. To do this, we need to implement a link of some sort in the CommentsComponent.
Let’s add a link button to the CommentsComponent.kt file:
package com.example.vok

import com.github.mvysny.karibudsl.v10.*
import com.vaadin.flow.component.HasComponents
import com.vaadin.flow.component.button.ButtonVariant
import com.vaadin.flow.component.orderedlayout.VerticalLayout

class CommentsComponent : KComposite() {
    var articleId: Long = 0L
        set(value) { field = value; refresh() }

    private lateinit var comments: VerticalLayout
    private val root = ui {
        verticalLayout {
            isMargin = false
            p("Comments")
            comments = verticalLayout()
        }
    }

    fun refresh() {
        comments.removeAll()
        Article.getById(articleId).comments.getAll().forEach { comment ->
            comments.apply {
                div {
                    html("<p><strong>Commenter:</strong>${comment.commenter}</p><p><strong>Comment:</strong>${comment.body}</p>")
                }
                button("Delete comment") {
                    addThemeVariants(ButtonVariant.LUMO_TERTIARY, ButtonVariant.LUMO_SMALL)
                    onClick { comment.delete(); refresh() }
                }
            }
        }
    }
}
// the extension function which will allow us to use CommentsComponent inside a DSL
fun HasComponents.commentsComponent(block: CommentsComponent.()->Unit = {}) = init(CommentsComponent(), block)
Clicking the “Delete comment” button will delete the comment and refresh the component, to show the rest of the comments.
Deleting Associated Objects
If you delete an article, its associated comments will also need to be deleted, otherwise they would simply occupy space in the database. Or even worse, since we have the foreign constraint set up, the database would fail to delete the article. We will need to modify the Article.delete() method to do that for us. Modify the Article.kt file and add the delete function right below the comments val, as follows:
    override fun delete() = db {
        Comment.deleteBy { Comment::article_id eq id }
        super.delete()
    }
Security
If you were to publish your blog online, anyone would be able to add, edit and delete articles or delete comments.
The Login Dialog
Adding security to Java WAR apps is usually done by letting the web server (e.g. Tomcat) handle the username/password storage and verification, while our web app provides the login dialog. To keep this guide web server agnostic, we’ll do the verification ourselves.
We will implement a login service and a login form. Just create the src/main/kotlin/com/example/vok/LoginService.kt file:
package com.example.vok

import com.vaadin.flow.component.UI
import eu.vaadinonkotlin.vaadin10.Session
import java.io.Serializable

data class User(val name: String) : Serializable

class LoginService : Serializable {

    fun login(username: String, password: String): Boolean {
        currentUser = User(username)
        UI.getCurrent().page.reload()
        return true
    }

    var currentUser: User? = null
        private set

    fun logout() {
        Session.current.close()
        UI.getCurrent().navigate("")
        UI.getCurrent().page.reload()
    }

    val isLoggedIn get() = currentUser != null
}

val Session.loginService: LoginService get() = getOrPut(LoginService::class) { LoginService() }
This will handle user log in and will store current user along with the LoginService into the session.
Next is the LoginView: just create the src/main/kotlin/com/example/vok/LoginView.kt file:
package com.example.vok
import com.github.mvysny.karibudsl.v10.*
import com.vaadin.flow.component.login.*
import com.vaadin.flow.router.*
import eu.vaadinonkotlin.vaadin10.*
@Route("login")
class LoginView : KComposite(), BeforeEnterObserver {
override fun beforeEnter(event: BeforeEnterEvent) {
if (Session.loginService.isLoggedIn) {
event.rerouteTo("")
}
}
private lateinit var loginForm: LoginForm
private val root = ui {
verticalLayout {
setSizeFull(); isPadding = false; content { center() }
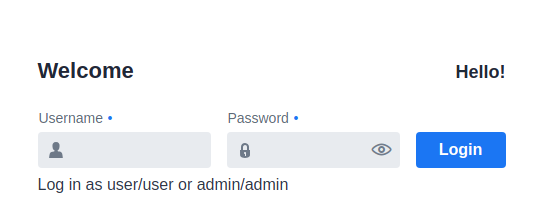
val loginI18n: LoginI18n = loginI18n {
header.title = "Hello!"
additionalInformation = "Log in as user/user or admin/admin"
}
loginForm = loginForm(loginI18n) {
addLoginListener { e ->
if (!Session.loginService.login(e.username, e.password)) {
isError = true
}
}
}
}
}
}
Now we need to intercept every navigation event and check whether the user is logged in, redirecting to the LoginView if it isn’t. Open the MainLayout class and add modify it as follows:
package com.example.vok

import com.github.mvysny.karibudsl.v10.KComposite
import com.github.mvysny.karibudsl.v10.div
import com.vaadin.flow.component.page.Viewport
import com.vaadin.flow.router.BeforeEnterEvent
import com.vaadin.flow.router.BeforeEnterObserver
import com.vaadin.flow.router.RouterLayout
import eu.vaadinonkotlin.vaadin10.Session

/**
 * The main layout:
 * * provides application frame around all views
 * * handles redirect to the [LoginView] if no user is logged in.
 */
@Viewport(Viewport.DEVICE_DIMENSIONS)
class MainLayout : KComposite(), RouterLayout, BeforeEnterObserver {
  private val root = ui {
    div {
      setSizeFull()
    }
  }

  /**
   * Invoked before a view is shown. We will perform security checks here - if
   * no user is logged in, we'll simply redirect to the LoginView.
   */
  override fun beforeEnter(event: BeforeEnterEvent) {
    if (event.navigationTarget != LoginView::class.java && !Session.loginService.isLoggedIn) {
      event.rerouteTo(LoginView::class.java)
    }
  }
}
This is how the LoginView component looks like:
The LoginService class handles the process of login/logout. Upon login, we will store the information about the currently logged-in user into the session. This will serve as a marker that there is someone logged in. We will also tell the browser to reload the page - this will reinstantiate the layouts.
Please follow the vok-security module documentation on how to properly integrate login dialog into your app.
Other Security Considerations
Security, especially in web applications, is a broad and detailed area. You can decide not to use the login dialog at all, and instead use the HTTP Basic Auth, thus letting the web server handle the security completely. You can also employ other security options. This is however out of scope of this tutorial.
Please see the Vaadin-on-Kotlin Security Demo sample project for more details.
What’s Next?
Now that you’ve seen your first VoK application, you should feel free to update it and experiment on your own.
Remember you don’t have to do everything without help. As you need assistance getting up and running with VoK, feel free to consult these support resources:
- The Vaadin-on-Kotlin Guides
- The Vaadin Tutorial for documentation on pure Vaadin and Java
- The Vaadin Forums for anything Vaadin-on-Kotlin-related
- The Kotlin Forums for Kotlin-related questions
Feedback
We encourage you to help improve the quality of this guide, for the benefit of all.
Please contribute if you see any typos or factual errors, compilation errors, outdated code or incomplete content. To get started, you can read our documentation contributions section.
If for whatever reason you spot something to fix but cannot patch it yourself, please open an issue.
And last but not least, any kind of discussion regarding Vaadin on Kotlin documentation is very welcome in the Vaadin Forums.
This work is licensed under a Creative Commons Attribution-ShareAlike 4.0 International License